Sophie Elizabeth Lynch
Tuesday 4 June 2013
Tuesday 21 May 2013
Stop Motion
Stop Motion - BBC three
In this lesson I plan to do some stop motion photos, for a photo shoot, then change them around using photoshop, and giving them a black background, and the 'BBC three' blood effect.
Then after planning what to do I started taking different photos, at different stages, step by step, taking photos of my faces in different stages, and the same with my hands. Then using photoshop I put the black background, and the 'BBC three' logo with blood in my hands.
Then after planning what to do I started taking different photos, at different stages, step by step, taking photos of my faces in different stages, and the same with my hands. Then using photoshop I put the black background, and the 'BBC three' logo with blood in my hands.
Evaluation:
In this lesson I thought it went really well, but I thought it went a little wrong for a few photos, so I re-did them and the added a few things using photoshop, which doesn't look too bad. I didn't use any reflectors, lights, just normal sun light and the camera. But over all it came out really well, but one thing I would change is, is to make it more realistic with the blood effect, and have more time to organize, so it doesn't look too messy, and more or less the same brightness and effect in the stop motion.
Photo Shoot
In this lesson we planned to photograph a story about the game of poo-stick (Winnie the Pooh).
The models were (me) Sophie and Dan, and the photographer was Jazz. We used sticks that we found, used the sun as our light sorce, did the photo shoot outside, and used the digital camera to take photos.
The models were (me) Sophie and Dan, and the photographer was Jazz. We used sticks that we found, used the sun as our light sorce, did the photo shoot outside, and used the digital camera to take photos.
First we sat down and relaxed in the sun, thinking what to do.
Then we think "poo-stick" and start walking to the bridge.
Still walking to the bridge.
Now we are at the bridge we think we need to find a stick, so we look for a stick.
We are looking for our stick, find it and pick it up.
"We found our sticks" we say, as you can see in the photo.
We go to the bridge, and say "in 3, 2, 1, drop the stick" so we drop it then run to the other side.
We are running to the other side.
We see our sticks on the other side and we see that Dans stick wins and (my) Sophies stick loses.
Dan jumps in the air for joy, and (me) Sophie is upset that she lost.
Evaluation:
This photo shoot was all taken outside to give an effect of real enjoyment of the game poo-stick. We didn't use any camera lights or reflectors, just used the sun light and the camera. Also we did is went outside, choice where to be for each photo, and find a stick and have fun playing poo-stick. I thought this photo shoot went really well with all the photos and structure of it all.
Tuesday 30 April 2013
Studio Session
I plan to take photos in the studio using my Nikon D3100 DSLR camera, and producing photos of this guy model, doing different poses.
For this photo I had the light in front of him so you have the light seeing the whole of him. Then I time the moment he is in the air with my camera by clicking half way on the button and when he is the air I fully click on the button to take the picture of the moment he is in the air where all the expression and action is.
For these two photos I had the light on the side of him to give a silhouette effect on one side of his face and body. I had the first photo of him with almost the whole of him in and the other just the top half, so you can see a close up on his face and stance.
For this one I experimented with a look to see what it looks like if I can get a shot where he's fixing his tie, and from my point of view it turned out really well. He has really nice stance and good posture, and the way he looks and does tie is very well captured, which worked very well for what I see.
In these four photos I was going for a James Bond look and starting off with him looking around for the first one, and for two and three I was capturing him starting to turn round and looking at his target, then for the four and final one I thought it would look nice for him to look like he's about to do something, like for example, pouncing or swinging round to get some one.
In these four photos I was experimenting with the way he looks and stands. For the first and second ones he had his jacket on and I took photos with different light angles, for example; I moved the light to in front of him so the light was straight at him and then used a silver reflector to enhance the light on his face more to see more. I had the first one just the top half of his body and the second one slightly closer to his face but still using the silver reflector. Then for the third and fourth ones I still used the silver reflector, but this time he didn't have his jacket on, plus for the third his body was looking one way and his face another way to look effective. For the fourth and final one still the same but the whole of his body was facing the camera, leaning forward, and looking straight at the camera. Overall these photos came out really well and very well positioned.
For these three photos I did almost the same thing with the James Bond ones but not in the the style of James Bond, what I mean is the first photo was the first bit, the second and third were the following ones. The first one is him turning round, the second is him still turning round but with more arm movement, and the third and final one is of him totally turned round looking at the camera with his hands in his pockets and looking very nice and professional.
Evaluation:
These photos I took in the studio which look amazing, but one thing I would try and do is to try and get his arms and hands in so the photos don't look croped and terrible. But in a way it looks good, and the lay out looks alright and very well produced, organised and structured with the light, camera, and the position of the model.
Monday 29 April 2013
Photos - Plan
When I start to plan a photo shoot first of all I think about the idea for the shoot and how I want it to look like, or I write it down on a piece of paper, then I go ahead and do it. But firstly I set up my area where I'll be shooting, for example; inside, I would put a giant piece of paper going from the ceiling to the some of the floor and make that my background. Then set up the lights where I want them to be and the same with my camera and model, but for my camera I would have to figure out what the settings need to be and the light exposure, before I start anything.
All these photos I took in class/lessons are unique in a way because they obviously show different styles and techniques, but have different ways of showing it, because in each photo I took I wanted it to be different and make it my own, but what I mean is making it show more than you see, like the expression which goes: 'there's more than meets the eyes', and that's what I'm trying to show in a way.
All these photos I took in class/lessons are unique in a way because they obviously show different styles and techniques, but have different ways of showing it, because in each photo I took I wanted it to be different and make it my own, but what I mean is making it show more than you see, like the expression which goes: 'there's more than meets the eyes', and that's what I'm trying to show in a way.
I've used this technique which I nicknamed ghosty effect, but what it really is, is slow shutter speed. The idea was to take the photo of our teacher when he's there and then wait 8 sceonds and then he moves away after 4 seconds. So you get a ghosty effect.
I used a fast shutter speed, and twisted the camera lens to get this twisted effect, with one of my friend's hair.
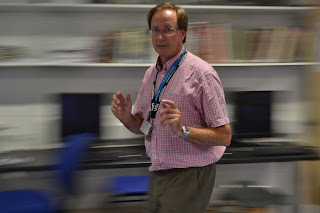
I used a fast shutter speed for this technique which I nicknamed "running superman". I followed him walking and when I can see him in the lens at the right point then I take the photo so it looks like he's running really fast hence the nickname "running superman". Although the more formal name for this technique is panning.


For these three photos I used a technique called freeze frame
using a fast shutter speed. I take the photo at the second where they are in the air where the action is, showing the jump in the air and the excitement in their faces.


using a fast shutter speed. I take the photo at the second where they are in the air where the action is, showing the jump in the air and the excitement in their faces.


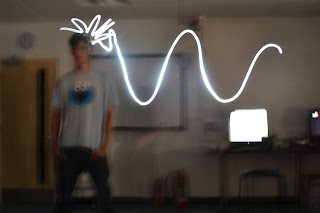
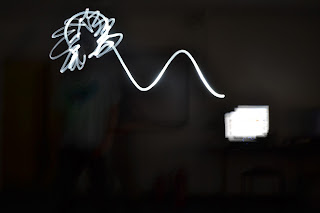
For these two photos I used a technique called light painting. To create light painting we took a touch and moved it around someone with a slow shutter speed on the camera.


For these two photos I used a technique called silhouette. I create this by using a hard light behind the person and then having a thin sheet of fabric in front of that person, with him putting his face leaning on the fabric, with different types of gel paper over the light showing different colours for the shoot. For example, for this I used blue and red.


For these three photos I used a technique called silhouette. I create this by using a hard light behind the person and having gel paper in front to give a lighting effect because of the creases in the gel paper.


For these nine photos I used a technique called horror lighting. I create these by using a hard light moving the object and light in different places to give horror effect to look scary and cool at the same time. I took photos from different angles to see if there's any difference in light, camera position, and position in the object.
Evaluation:
I find that all these different techniques are very useful for future events because you may want to use on style for one thing and another style for something else, because there are so many styles to choose from when doing photo shoots or just experimenting in class or outer class in your own time. But overall all these techniques are useful in a way to help and teacher you to understand more with your camera and professional work in life.
Subscribe to:
Posts (Atom)


