When I start to plan a photo shoot first of all I think about the idea for the shoot and how I want it to look like, or I write it down on a piece of paper, then I go ahead and do it. But firstly I set up my area where I'll be shooting, for example; inside, I would put a giant piece of paper going from the ceiling to the some of the floor and make that my background. Then set up the lights where I want them to be and the same with my camera and model, but for my camera I would have to figure out what the settings need to be and the light exposure, before I start anything.
All these photos I took in class/lessons are unique in a way because they obviously show different styles and techniques, but have different ways of showing it, because in each photo I took I wanted it to be different and make it my own, but what I mean is making it show more than you see, like the expression which goes: 'there's more than meets the eyes', and that's what I'm trying to show in a way.
All these photos I took in class/lessons are unique in a way because they obviously show different styles and techniques, but have different ways of showing it, because in each photo I took I wanted it to be different and make it my own, but what I mean is making it show more than you see, like the expression which goes: 'there's more than meets the eyes', and that's what I'm trying to show in a way.

I've used this technique which I nicknamed ghosty effect, but what it really is, is slow shutter speed. The idea was to take the photo of our teacher when he's there and then wait 8 sceonds and then he moves away after 4 seconds. So you get a ghosty effect.

I used a fast shutter speed, and twisted the camera lens to get this twisted effect, with one of my friend's hair.

I used a fast shutter speed for this technique which I nicknamed "running superman". I followed him walking and when I can see him in the lens at the right point then I take the photo so it looks like he's running really fast hence the nickname "running superman". Although the more formal name for this technique is panning.


For these three photos I used a technique called freeze frame
using a fast shutter speed. I take the photo at the second where they are in the air where the action is, showing the jump in the air and the excitement in their faces.
using a fast shutter speed. I take the photo at the second where they are in the air where the action is, showing the jump in the air and the excitement in their faces.
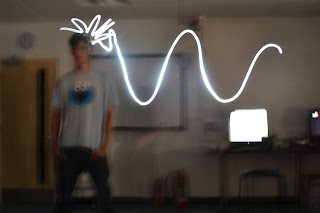
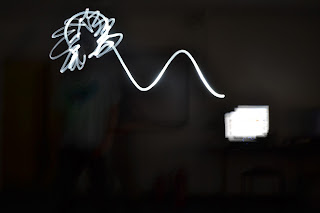
For these two photos I used a technique called light painting. To create light painting we took a touch and moved it around someone with a slow shutter speed on the camera.


For these two photos I used a technique called silhouette. I create this by using a hard light behind the person and then having a thin sheet of fabric in front of that person, with him putting his face leaning on the fabric, with different types of gel paper over the light showing different colours for the shoot. For example, for this I used blue and red.


For these three photos I used a technique called silhouette. I create this by using a hard light behind the person and having gel paper in front to give a lighting effect because of the creases in the gel paper.


For these nine photos I used a technique called horror lighting. I create these by using a hard light moving the object and light in different places to give horror effect to look scary and cool at the same time. I took photos from different angles to see if there's any difference in light, camera position, and position in the object.
Evaluation:
I find that all these different techniques are very useful for future events because you may want to use on style for one thing and another style for something else, because there are so many styles to choose from when doing photo shoots or just experimenting in class or outer class in your own time. But overall all these techniques are useful in a way to help and teacher you to understand more with your camera and professional work in life.
No comments:
Post a Comment