Tuesday, 30 April 2013

Studio Session

I plan to take photos in the studio using my Nikon D3100 DSLR camera, and producing photos of this guy model, doing different poses.

For this photo I had the light in front of him so you have the light seeing the whole of him. Then I time the moment he is in the air with my camera by clicking half way on the button and when he is the air I fully click on the button to take the picture of the moment he is in the air where all the expression and action is.

For these two photos I had the light on the side of him to give a silhouette effect on one side of his face and body. I had the first photo of him with almost the whole of him in and the other just the top half, so you can see a close up on his face and stance.

For this one I experimented with a look to see what it looks like if I can get a shot where he's fixing his tie, and from my point of view it turned out really well. He has really nice stance and good posture, and the way he looks and does tie is very well captured, which worked very well for what I see.

In these four photos I was going for a James Bond look and starting off with him looking around for the first one, and for two and three I was capturing him starting to turn round and looking at his target, then for the four and final one I thought it would look nice for him to look like he's about to do something, like for example, pouncing or swinging round to get some one.

In these four photos I was experimenting with the way he looks and stands. For the first and second ones he had his jacket on and I took photos with different light angles, for example; I moved the light to in front of him so the light was straight at him and then used a silver reflector to enhance the light on his face more to see more. I had the first one just the top half of his body and the second one slightly closer to his face but still using the silver reflector. Then for the third and fourth ones I still used the silver reflector, but this time he didn't have his jacket on, plus for the third his body was looking one way and his face another way to look effective. For the fourth and final one still the same but the whole of his body was facing the camera, leaning forward, and looking straight at the camera. Overall these photos came out really well and very well positioned.

For these three photos I did almost the same thing with the James Bond ones but not in the the style of James Bond, what I mean is the first photo was the first bit, the second and third were the following ones. The first one is him turning round, the second is him still turning round but with more arm movement, and the third and final one is of him totally turned round looking at the camera with his hands in his pockets and looking very nice and professional.

Evaluation:
These photos I took in the studio which look amazing, but one thing I would try and do is to try and get his arms and hands in so the photos don't look croped and terrible. But in a way it looks good, and the lay out looks alright and very well produced, organised and structured with the light, camera, and the position of the model.

Monday, 29 April 2013

Photos - Plan

When I start to plan a photo shoot first of all I think about the idea for the shoot and how I want it  to look like, or I write it down on a piece of paper, then I go ahead and do it. But firstly I set up my area where I'll be shooting, for example; inside, I would put a giant piece of paper going from the ceiling to the some of the floor and make that my background. Then set up the lights where I want them to be and the same with my camera and model, but for my camera I would have to figure out what the settings need to be and the light exposure, before I start anything.

All these photos I took in class/lessons are unique in a way because they obviously show different styles and techniques, but have different ways of showing it, because in each photo I took I wanted it to be different and make it my own, but what I mean is making it show more than you see, like the expression which goes: 'there's more than meets the eyes', and that's what I'm trying to show in a way.


I've used this technique which I nicknamed ghosty effect, but what it really is, is slow shutter speed. The idea was to take the photo of our teacher when he's there and then wait 8 sceonds and then he moves away after 4 seconds. So you get a ghosty effect.


I used a fast shutter speed, and twisted the camera lens to get this twisted effect, with one of my friend's hair.


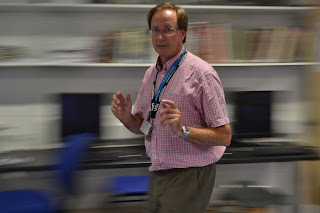
I used a fast shutter speed for this technique which I nicknamed "running superman". I followed him walking and when I can see him in the lens at the right point then I take the photo so it looks like he's running really fast hence the nickname "running superman". Although the more formal name for this technique is panning.


For these three photos I used a technique called freeze frame
 using a fast shutter speed. I take the photo at the second where they are in the air where the action is, showing the jump in the air and the excitement in their faces.


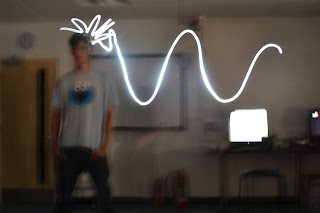
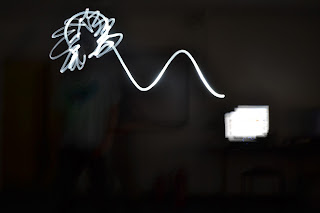
For these two photos I used a technique called light painting. To create light painting we took a touch and moved it around someone with a slow shutter speed on the camera.


For these two photos I used a technique called silhouette. I create this by using a hard light behind the person and then having a thin sheet of fabric in front of that person, with him putting his face leaning on the fabric, with different types of gel paper over the light showing different colours for the shoot. For example, for this I used blue and red. 
For these three photos I used a technique called silhouette. I create this by using a hard light behind the person and having gel paper in front to give a lighting effect because of the creases in the gel paper. 


For these nine photos I used a technique called horror lighting. I create these by using a hard light moving the object and light in different places to give horror effect to look scary and cool at the same time. I took photos from different angles to see if there's any difference in light, camera position, and position in the object.
Evaluation:
I find that all these different techniques are very useful for future events because you may want to use on style for one thing and another style for something else, because there are so many styles to choose from when doing photo shoots or just experimenting in class or outer class in your own time. But overall all these techniques are useful in a way to help and teacher you to understand more with your camera and professional work in life.

Exposure Histograms for Over, Under & Correct Exposure


How to use Histograms
The best way to evaluate exposure is to look at the picture, not a histogram. Histograms are a way to measure exposure more objectively for those who can't see very well. Histograms don't replace your eyes and experience. Histograms are helpful in sunlight where it's hard to see an LCD, or in the shop if setting something exactly. Your eyes are always the final judge.

A histogram is a graph counting how many pixels are at each level between black and white.
Black is on the left. White is on the right.
The height of the graph at each point depends on how many pixels are that bright.
Lighter images move the graph to the right. Darker ones move it to the left. Easy!
More Pixels


Fewer Pixels
Histogram
gradient
Black  -  Dark  -  Medium  -  Light  -  White
A Histogram
A good image often, but not always, has a histogram spread all over.

SETTING EXPOSURE
Showing a single histogram to simplify. DON'T use a single histogram to set exposure! You need a colour histogram, otherwise you may overexpose coloured areas and not know it. Read on to Colour Histograms after you read this.

Contrary to your camera manual, the histogram doesn't have to be in the middle. Black cats in coal mines may only use the left half. Snow scenes may only use the right half.
The critical thing for which a histogram is helpful is to determine if any highlights have been clipped and washed out. Overexposure is death for a digital image. Histograms make this easy to check. If you have washed-out areas of 100% white (digital value 255) you'll see a tall vertical line at the far right of the histogram.
If you blow an image to smithereens you'll see more than just one line peaked on the right. You may see a train wreck!


In these three photos I took you can see that I took them using three different settings on my camera. 
Firstly I changed the camera to 'S' which is 'Shutter Priority Auto', and changed the numbers where is circled in red to '0.0', '+0.3', and '-0.3'.
So they come out like these:

This one is 'Normal exposure' which the setting is '0.0'.
This one is 'Overexposure' which the setting is '+0.3'
This one is 'Underexposure' which the setting is '-0.3'.

Normal

Over

Under


Wednesday, 24 April 2013

Camera Exposure: Aperture, Shutter Speed and ISO


Camera Exposure

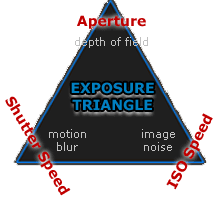
A photograph’s exposure determines how light or dark an image will appear when it’s been captured by your camera. Believe it or not, this is determined by just three camera settings: aperture, ISO and shutter speed (the “exposure triangle”). Mastering their use is an essential part of developing an intuition for photography.

Exposure Triangle: Aperture, ISO & Shutter Speed


Each setting controls exposure differently:

Aperture – controls the area over which light can enter your camera.

Shutter speed – controls the duration of the exposure.

ISO speed – controls the sensitivity of your camera’s sensor to give amount of light.

One can therefore use many combinations of the above three settings to achieve the same exposure. The key, however, is knowing which trade-offs to make, since each setting also influences other image properties. For example, aperture affects depth of field, shutter speed affects motion blur and ISO speed affects image noise.

Shutter Speed

A camera's shutter determines when the camera sensor will be open or closed to incoming light from the camera lens. The shutter speed specifically refers to how long this light is permitted to enter the camera. "Shutter speed" and "exposure time" refer to the same concept, where a faster shutter speed means a shorter exposure time.

By the Numbers. Shutter speed's influence on exposure is perhaps the simplest of the three camera settings: it correlates exactly 1:1 with the amount of light entering the camera. For example, when exposure time doubles the amount of light entering the camera doubles. It's also the setting that has the widest range of possibilities:


Aperture Setting

A camera's aperture setting controls the area over which light can pass through your camera lens. It is specified in terms an f-stop value, which can at times be counter intuitive, because the area of the opening increases as the f-stop decreases. In photographer slang, which someone says the are "stopping down" or "opening up" their lens, they are referring to increasing and decreasing the f-stop value, respectively. 


By the Numbers. Every time f-stop value halves, the light-collecting area quadruples. There's a formula for this, but most photographers just memorize the f-stop numbers that correspond to each doubling/halving of light:


The above aperture and shutter speed combinations all result in the same exposure.
Note: Shutter speed values are not always possible in increments of exactly double or half another shutter speed, but they're always close enough that the difference is negligible. 

The above f-stop numbers are all standard options in any camera, although most allow finer adjustments, such as f/3.2 and f/6.3. The range of values may also vary from camera to camera (or lens to lens). For example, a compact camera might have an available range of f/2.8 to f/8.0, whereas a digital SLR camera might have a range of f/1.4 to f/32 with a portrait lens. A narrow aperture range usually isn't a big problem, but a greater range does provide for more creative flexibility.


ISO Speed

The ISO speed determines how sensitive the camera is to incoming light. Similar to shutter speed, i also correlates 1:1 with how much the exposure increases or decreases. However, unlike aperture and shutter speed, a lower ISO speed is almost always desirable, since higher ISO speeds dramatically increase image noise. As a result, ISO speed is usually only increased from its minimum value if the desired aperture and shutter speed aren't otherwise obtainable.


Note: Image noise is also known as "film grain" in traditional film photography.

Common ISO speeds include 100, 200, 400 and 800, although many cameras also permit lower or higher values. With compact cameras, an ISO speed in the range of 50-200 generally produces acceptably low image noise, whereas with digital SLR cameras, a range of 50-800 (or higher) is often acceptable.

Camera Exposure Modes


Most digital cameras have one of the following standardized exposure modes: Auto (green rectangle), Program (P), Aperture Priority (Av), Shutter Priority (Tv), Manual (M) and Bulb (B) mode. Av, Tv, and M are often called "creative modes" or "auto exposure (AE) modes."

Each of these modes influences how aperture, ISO and shutter speed are chosen for a given exposure. Some modes attempt to pick all three values for you, whereas others let you specify one setting and the camera picks the other two (if possible). The following charts describe how each mode pertains to exposure:


In addition, the camera may also have several pre-set modes; the most common include landscape, portrait, sports and night mode. The symbols used for each mode vary slightly from camera, but will likely appear similar to those below:


However, keep in mind that most of the above settings rely on the camera's metering system in order to know what's a proper exposure. For tricky subject matter, metering can often be fooled, so it's a good idea to also be aware of when it might go awry, and what you can do to compensate for such exposure errors.