Monday, 29 April 2013

Exposure Histograms for Over, Under & Correct Exposure


How to use Histograms
The best way to evaluate exposure is to look at the picture, not a histogram. Histograms are a way to measure exposure more objectively for those who can't see very well. Histograms don't replace your eyes and experience. Histograms are helpful in sunlight where it's hard to see an LCD, or in the shop if setting something exactly. Your eyes are always the final judge.

A histogram is a graph counting how many pixels are at each level between black and white.
Black is on the left. White is on the right.
The height of the graph at each point depends on how many pixels are that bright.
Lighter images move the graph to the right. Darker ones move it to the left. Easy!
More Pixels


Fewer Pixels
Histogram
gradient
Black  -  Dark  -  Medium  -  Light  -  White
A Histogram
A good image often, but not always, has a histogram spread all over.

SETTING EXPOSURE
Showing a single histogram to simplify. DON'T use a single histogram to set exposure! You need a colour histogram, otherwise you may overexpose coloured areas and not know it. Read on to Colour Histograms after you read this.

Contrary to your camera manual, the histogram doesn't have to be in the middle. Black cats in coal mines may only use the left half. Snow scenes may only use the right half.
The critical thing for which a histogram is helpful is to determine if any highlights have been clipped and washed out. Overexposure is death for a digital image. Histograms make this easy to check. If you have washed-out areas of 100% white (digital value 255) you'll see a tall vertical line at the far right of the histogram.
If you blow an image to smithereens you'll see more than just one line peaked on the right. You may see a train wreck!


In these three photos I took you can see that I took them using three different settings on my camera. 
Firstly I changed the camera to 'S' which is 'Shutter Priority Auto', and changed the numbers where is circled in red to '0.0', '+0.3', and '-0.3'.
So they come out like these:

This one is 'Normal exposure' which the setting is '0.0'.
This one is 'Overexposure' which the setting is '+0.3'
This one is 'Underexposure' which the setting is '-0.3'.

Normal

Over

Under


Wednesday, 24 April 2013

Camera Exposure: Aperture, Shutter Speed and ISO


Camera Exposure

A photograph’s exposure determines how light or dark an image will appear when it’s been captured by your camera. Believe it or not, this is determined by just three camera settings: aperture, ISO and shutter speed (the “exposure triangle”). Mastering their use is an essential part of developing an intuition for photography.

Exposure Triangle: Aperture, ISO & Shutter Speed


Each setting controls exposure differently:

Aperture – controls the area over which light can enter your camera.

Shutter speed – controls the duration of the exposure.

ISO speed – controls the sensitivity of your camera’s sensor to give amount of light.

One can therefore use many combinations of the above three settings to achieve the same exposure. The key, however, is knowing which trade-offs to make, since each setting also influences other image properties. For example, aperture affects depth of field, shutter speed affects motion blur and ISO speed affects image noise.

Shutter Speed

A camera's shutter determines when the camera sensor will be open or closed to incoming light from the camera lens. The shutter speed specifically refers to how long this light is permitted to enter the camera. "Shutter speed" and "exposure time" refer to the same concept, where a faster shutter speed means a shorter exposure time.

By the Numbers. Shutter speed's influence on exposure is perhaps the simplest of the three camera settings: it correlates exactly 1:1 with the amount of light entering the camera. For example, when exposure time doubles the amount of light entering the camera doubles. It's also the setting that has the widest range of possibilities:


Aperture Setting

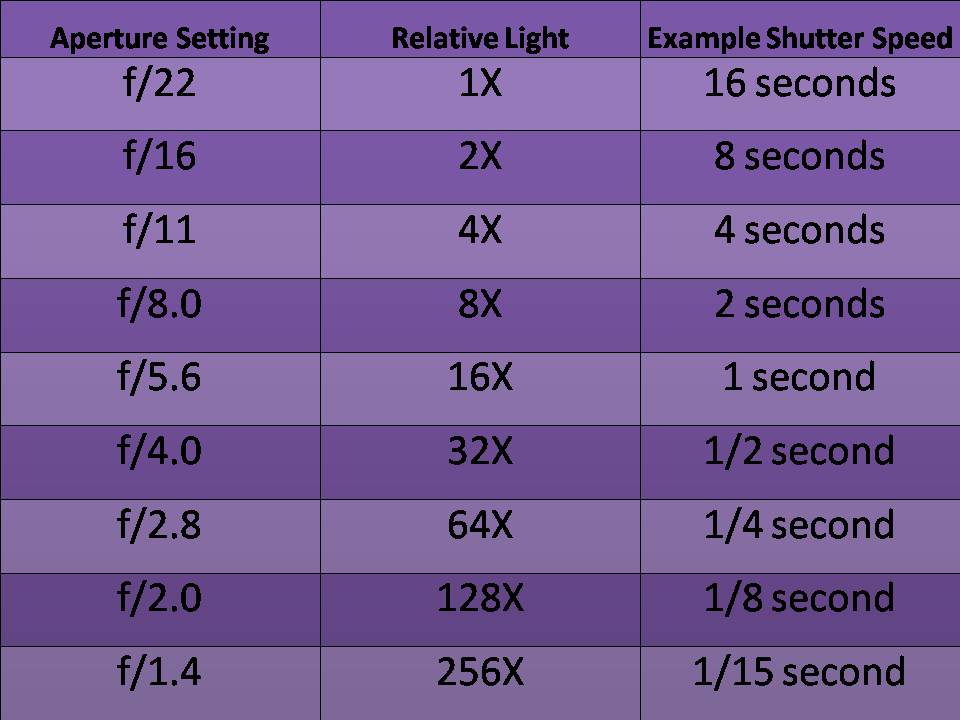
A camera's aperture setting controls the area over which light can pass through your camera lens. It is specified in terms an f-stop value, which can at times be counter intuitive, because the area of the opening increases as the f-stop decreases. In photographer slang, which someone says the are "stopping down" or "opening up" their lens, they are referring to increasing and decreasing the f-stop value, respectively. 


By the Numbers. Every time f-stop value halves, the light-collecting area quadruples. There's a formula for this, but most photographers just memorize the f-stop numbers that correspond to each doubling/halving of light:


The above aperture and shutter speed combinations all result in the same exposure.
Note: Shutter speed values are not always possible in increments of exactly double or half another shutter speed, but they're always close enough that the difference is negligible. 

The above f-stop numbers are all standard options in any camera, although most allow finer adjustments, such as f/3.2 and f/6.3. The range of values may also vary from camera to camera (or lens to lens). For example, a compact camera might have an available range of f/2.8 to f/8.0, whereas a digital SLR camera might have a range of f/1.4 to f/32 with a portrait lens. A narrow aperture range usually isn't a big problem, but a greater range does provide for more creative flexibility.


ISO Speed

The ISO speed determines how sensitive the camera is to incoming light. Similar to shutter speed, i also correlates 1:1 with how much the exposure increases or decreases. However, unlike aperture and shutter speed, a lower ISO speed is almost always desirable, since higher ISO speeds dramatically increase image noise. As a result, ISO speed is usually only increased from its minimum value if the desired aperture and shutter speed aren't otherwise obtainable.


Note: Image noise is also known as "film grain" in traditional film photography.

Common ISO speeds include 100, 200, 400 and 800, although many cameras also permit lower or higher values. With compact cameras, an ISO speed in the range of 50-200 generally produces acceptably low image noise, whereas with digital SLR cameras, a range of 50-800 (or higher) is often acceptable.

Camera Exposure Modes


Most digital cameras have one of the following standardized exposure modes: Auto (green rectangle), Program (P), Aperture Priority (Av), Shutter Priority (Tv), Manual (M) and Bulb (B) mode. Av, Tv, and M are often called "creative modes" or "auto exposure (AE) modes."

Each of these modes influences how aperture, ISO and shutter speed are chosen for a given exposure. Some modes attempt to pick all three values for you, whereas others let you specify one setting and the camera picks the other two (if possible). The following charts describe how each mode pertains to exposure:


In addition, the camera may also have several pre-set modes; the most common include landscape, portrait, sports and night mode. The symbols used for each mode vary slightly from camera, but will likely appear similar to those below:


However, keep in mind that most of the above settings rely on the camera's metering system in order to know what's a proper exposure. For tricky subject matter, metering can often be fooled, so it's a good idea to also be aware of when it might go awry, and what you can do to compensate for such exposure errors.


Tuesday, 26 February 2013

3D pictures

I created these images by using Photoshop, but first I took a picture of an image, then taking another image but 7cm to the right. Then combining them together using Photoshop to create a 3D image. (You need 3D glasses to look at these in 3D effect.)


Health and Safety


Before Starting Work in the Darkroom and Turning Off the Main Lights.

Make sure all work surfaces are clean and free of debris, litter etc.

Put any bags or belongings away from these work areas.

Remember the darkroom is a low light, and even no light, working environment. So store coats, bags etc. where they cannot be tripped over. Under the enlarger bench is a good place.

Make sure that the equipment you intend to use are clean, dry and to hand.

Turn on any extractor fans.

Check that the enlarger bulb is working.

Check that the chemicals you wish to use are fresh.

Mix any chemicals you need and place them in the correct apparatus, for example printing trays, before turning off the main white light.

Do not take food or drink into the darkroom.

Correct Use of Chemicals in the Darkroom.

Always keep chemicals away from the dry benches and electricity.

Water based chemicals and electricity do not mix and can be lethal.

Do not touch electrical equipment, enlargers, timers etc. with wet or damp hands.

This is one of the reasons darkrooms are built with a dry bench area, for enlargers etc., and a wet bench area, for chemicals, printing trays, developing tanks etc.

Do not walk around carrying chemicals in printing trays, developing tanks etc. You can spill them and cause the floor to become slippery.

Wear protective gloves if possible, if not, avoid prolonged contact with photographic chemicals. If you have sensitive skin take special care. When printing use printing tongs.

When you have finished wash your hands.

Take care not to put fingers in or near your mouth and do not rub your eyes.

If you get chemicals in your eyes, via a splash or rubbing your eyes, use an eyewash and seek medical attention. Take the chemical bottle, showing label, with you when you visit Doctors.

If you have a cut or a graze on your hand protect it with a waterproof plaster. After you have finished working in the darkroom remove the plaster as it may have chemicals on it.

When pouring chemicals take care not to splash.

Always wipe up any spillage right away.

Using Photographic Lighting Equipment Safely

Always uncoil all electricity cables, do not leave them wound on any storage spool. If you do this the coiled cable gets hot and there is a serious risk of fire.

Tape down, using strong ' gaffer ' tape. This prevents people tripping up on loose cabling.

Always use the correct lighting stand for the photographic lighting you are using.

Do not over reach/raise the lighting stand, this can cause the stand to tip over.

Please remember that photographic lights, particularly tungsten, can get very hot. Do not over balance them. If they fall onto a model, for example, they can cause horrific burns to skin.

If they fall whilst unattended there is serious risk of fire.

If adjusting ' barn-doors ' etc. on tungsten lighting ALWAYS use protective gloves.

After you have finished, allow the lighting equipment to cool down before moving.

Always use the correct fuse's specified for the equipment you are using.

Do not over load electricity supply/circuit.

Photographer Research


Parts & functions of Camera parts & controls and Names of studio equipment


Tuesday, 18 December 2012

Dark Room Pieces

We went in the Dark Room and produced some images using photogram paper, red light to keep it from getting damage, in other words safe, a normal light for when you’re ready to get it printed, three special types of liquids and water for the end, so no chemicals will be on the paper. Use tweezers so you don’t get your hand damaged by the chemicals.